Central Machinery 12 x 36 Wood Lathe
Current Status: Operational
Maintenance Log
20260622: expandable chuck jaws oiled; lathe cleaned
Pre-Usage Notes
Danger
Users assume all risk associated with the use of tools and equipment in this facility.
Warning
- Eye protection is REQUIRED
- Tool certification is REQUIRED
- Tying back of long hair is REQUIRED
- Tying back of straps, or other hanging pieces of clothing, is HIGHLY RECOMMENDED
- Do not use loose clothing, specifically long sleeves, when operating this tool
Note
- The lathe speed can only be adjusted one speed level while the lathe is turned off. Before mounting workpieces turn the lathe on and lower the speed for safety
- Use of a dust mask, or respirator, is recommended
- Bringing your own PPE is recommended
Lathe Overview
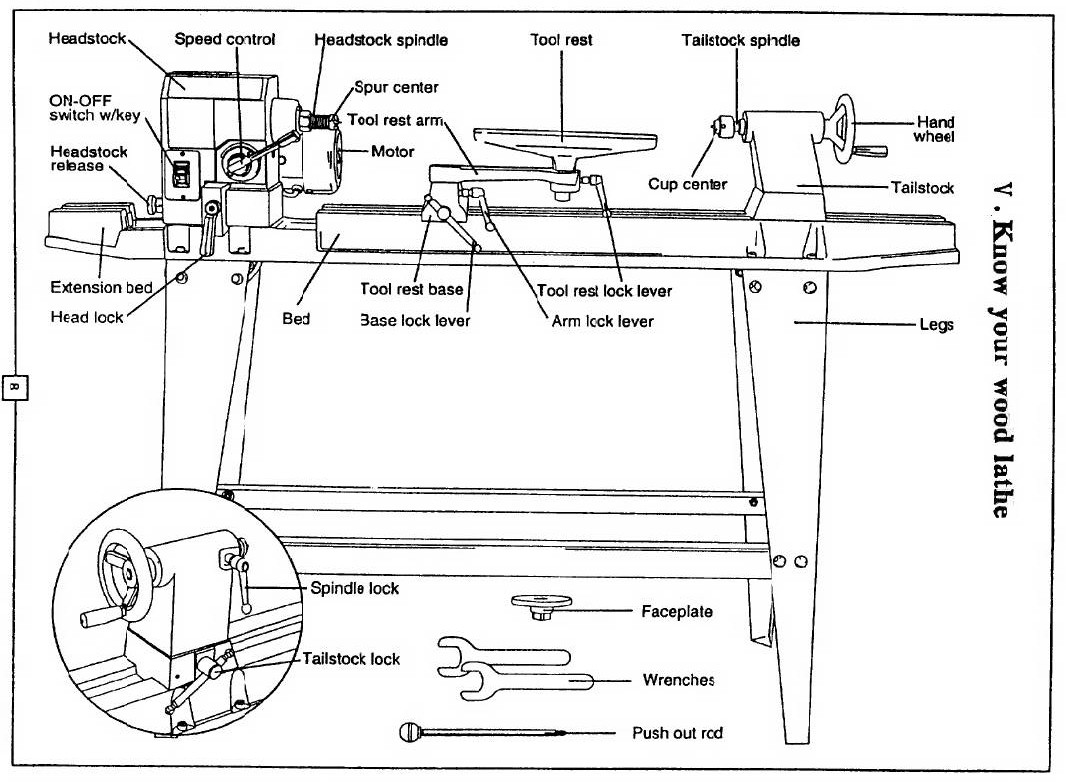
Chucks and Mounting Tools
Spur Drive
Expandable Chuck
Chuck Body
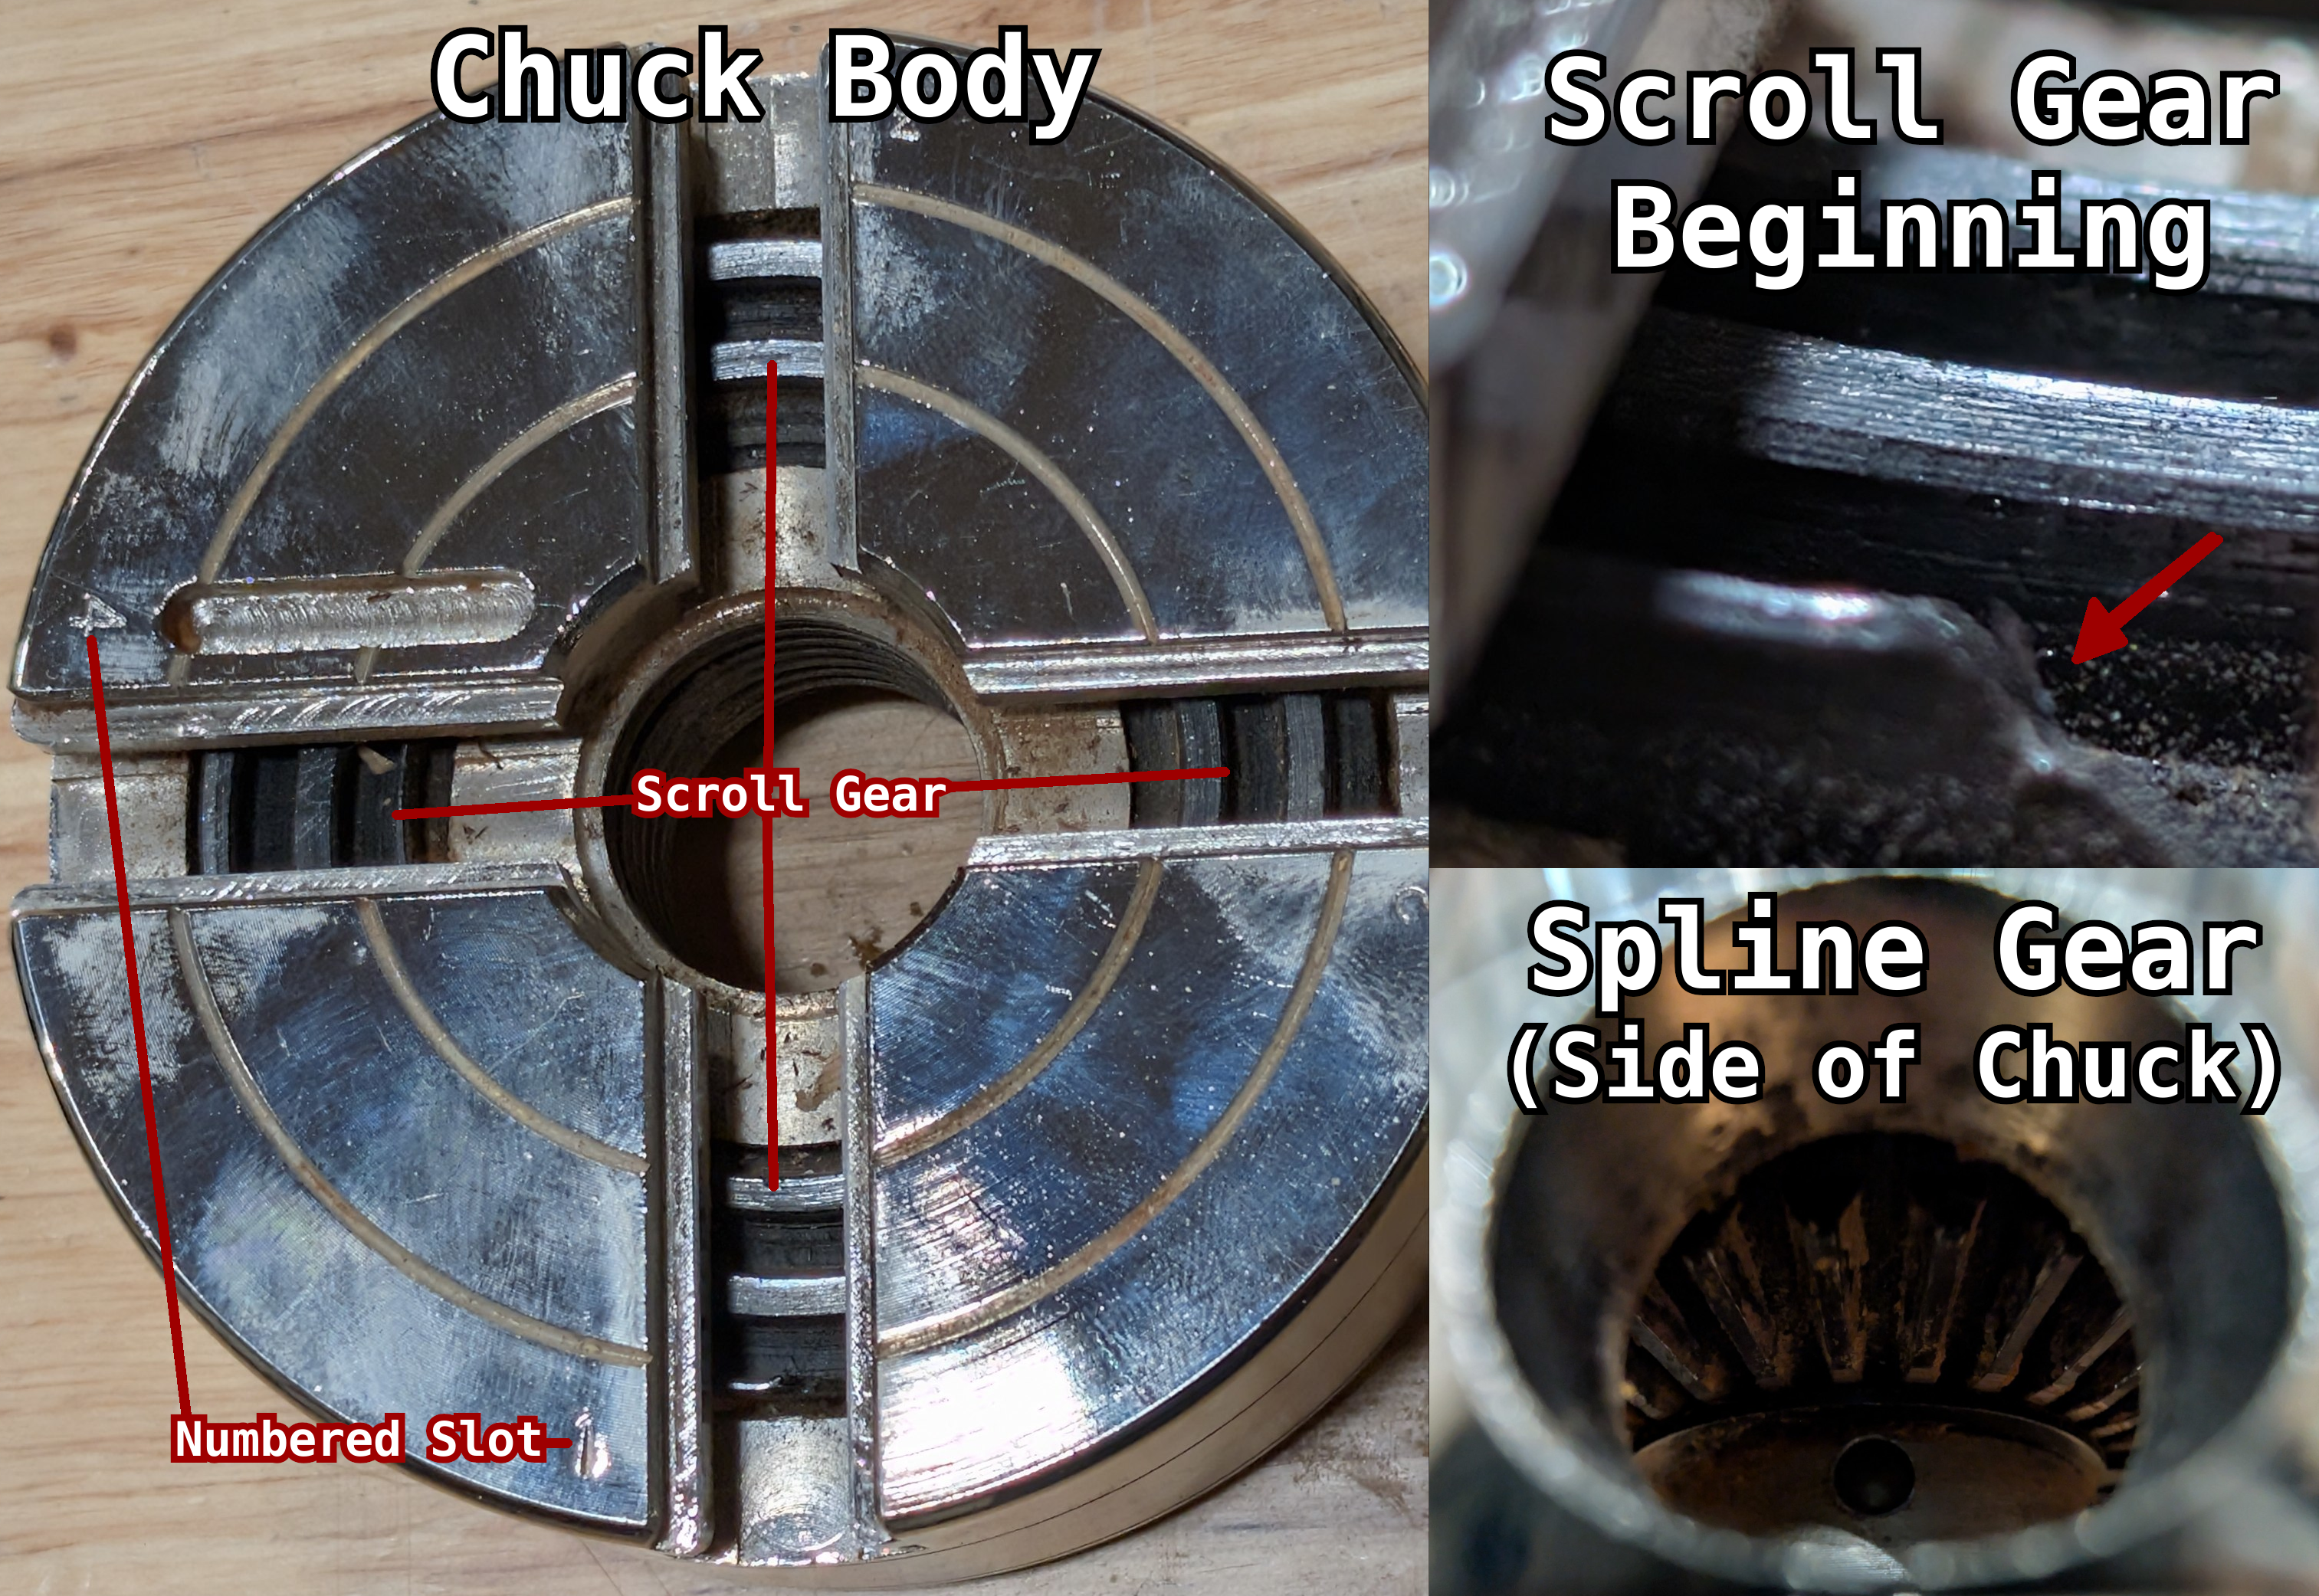
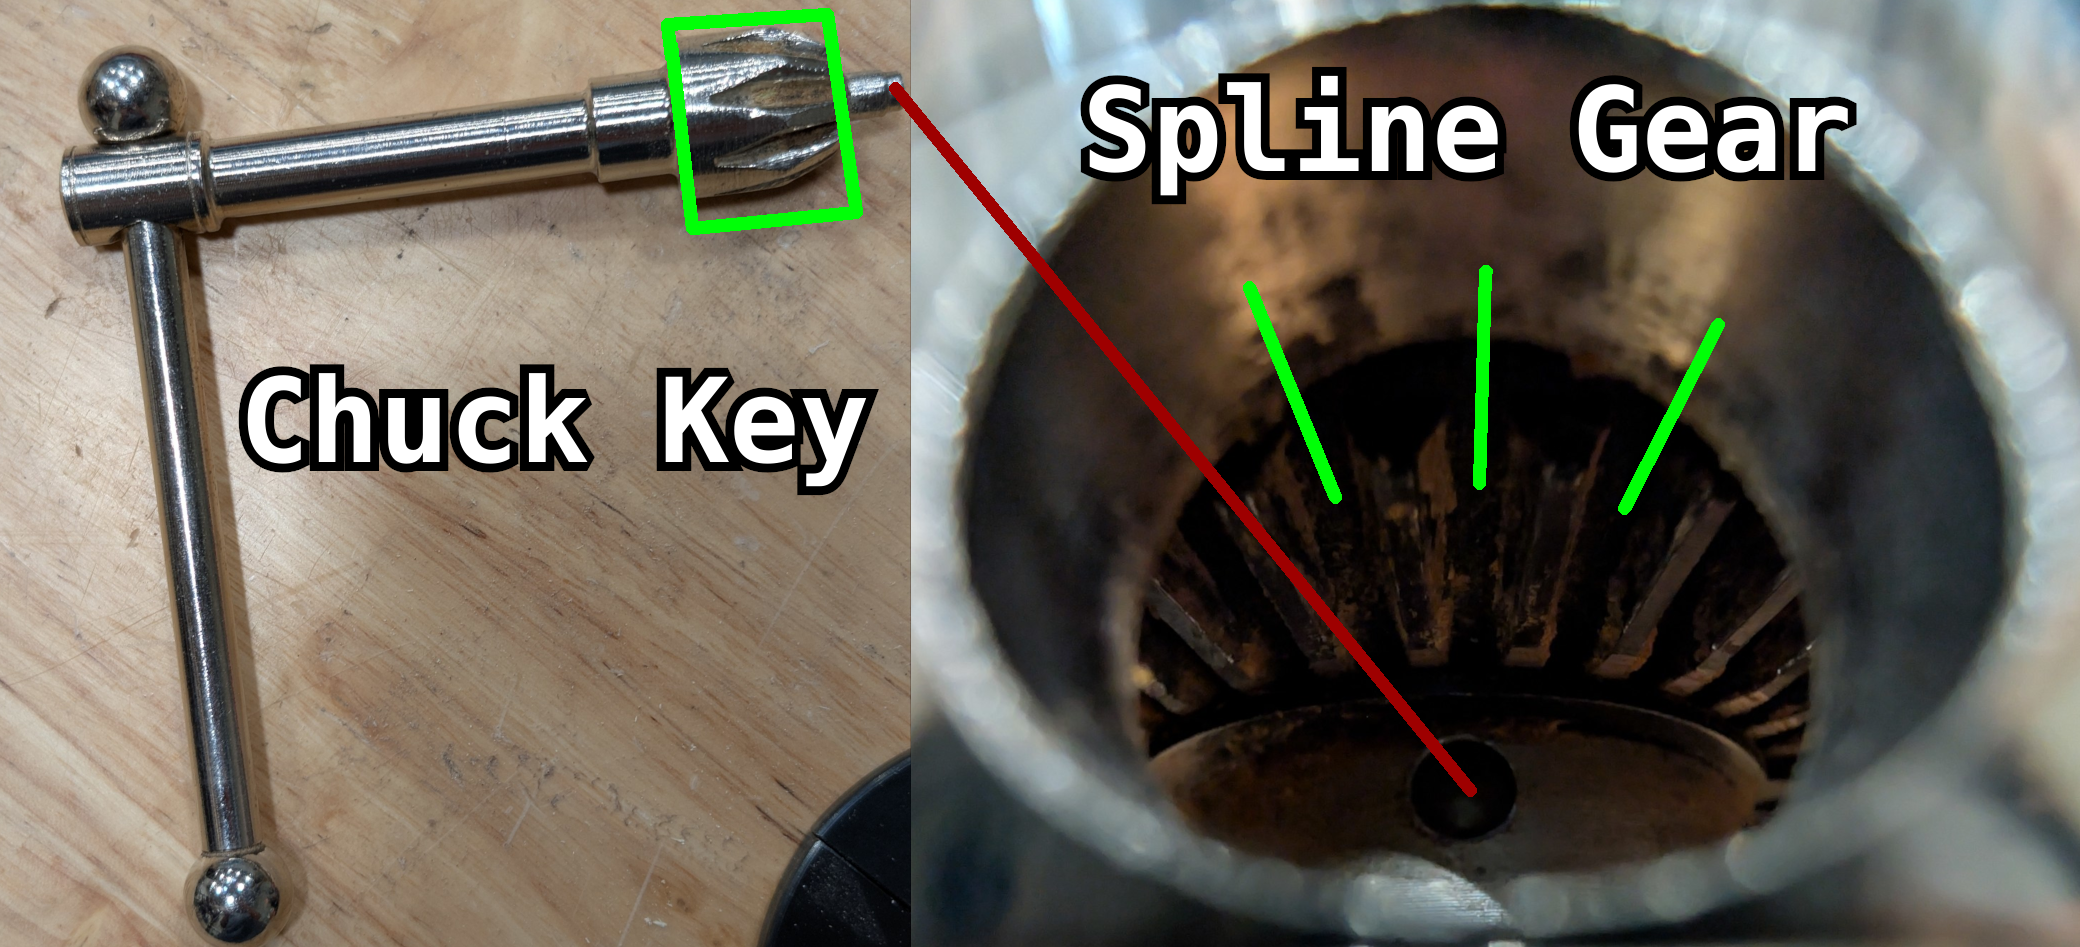
The chuck body is the main workholding component that interfaces with the headstock threads of a lathe. The body uses carriers to move jaws inward and outward to securely grip work. The carriers ride on a scroll gear and can be used in any combination of 1-4 jaw/carrier combinations. The scroll gear is driven by a spline gear which takes a key. Turning the key clockwise will tighten the jaws, and turning the key counterclockwise will expanded the jaws.
Carriers
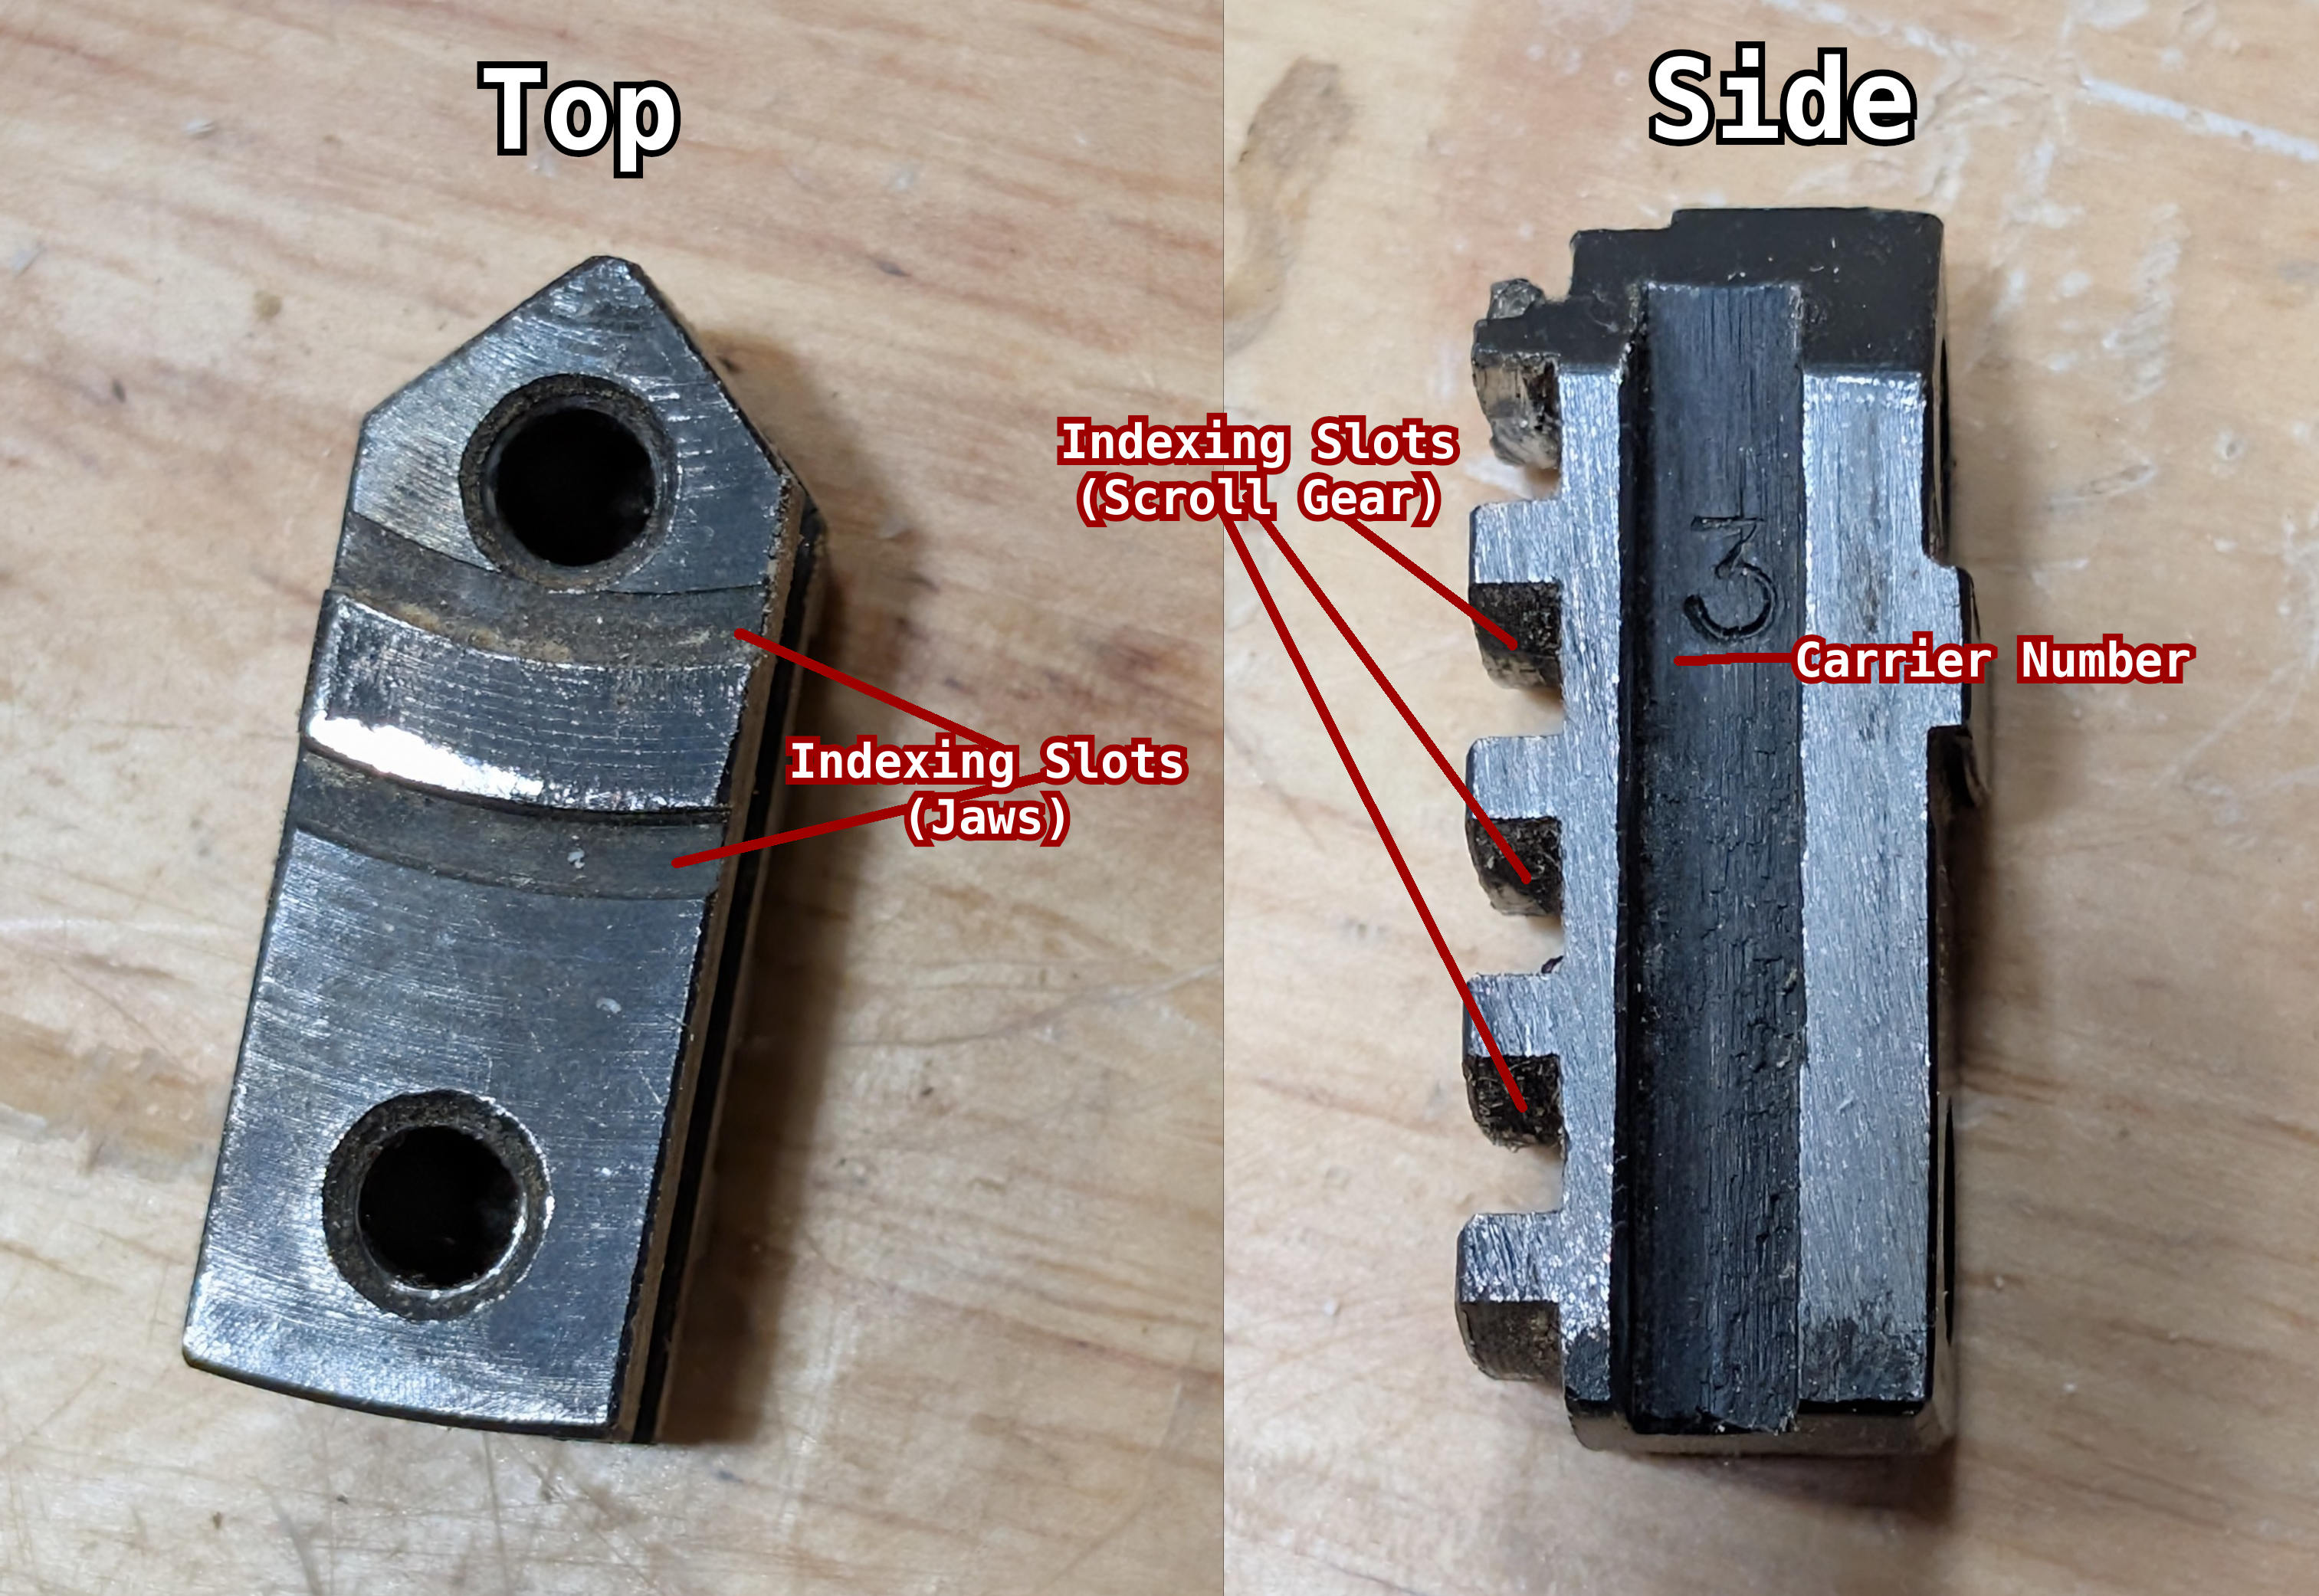
The carrier numbers go with the associated slot on the chuck body. The carriers are the attachment points for jaws and can advance inwards or outwards to meet the size needs of a workpiece.
Jaws
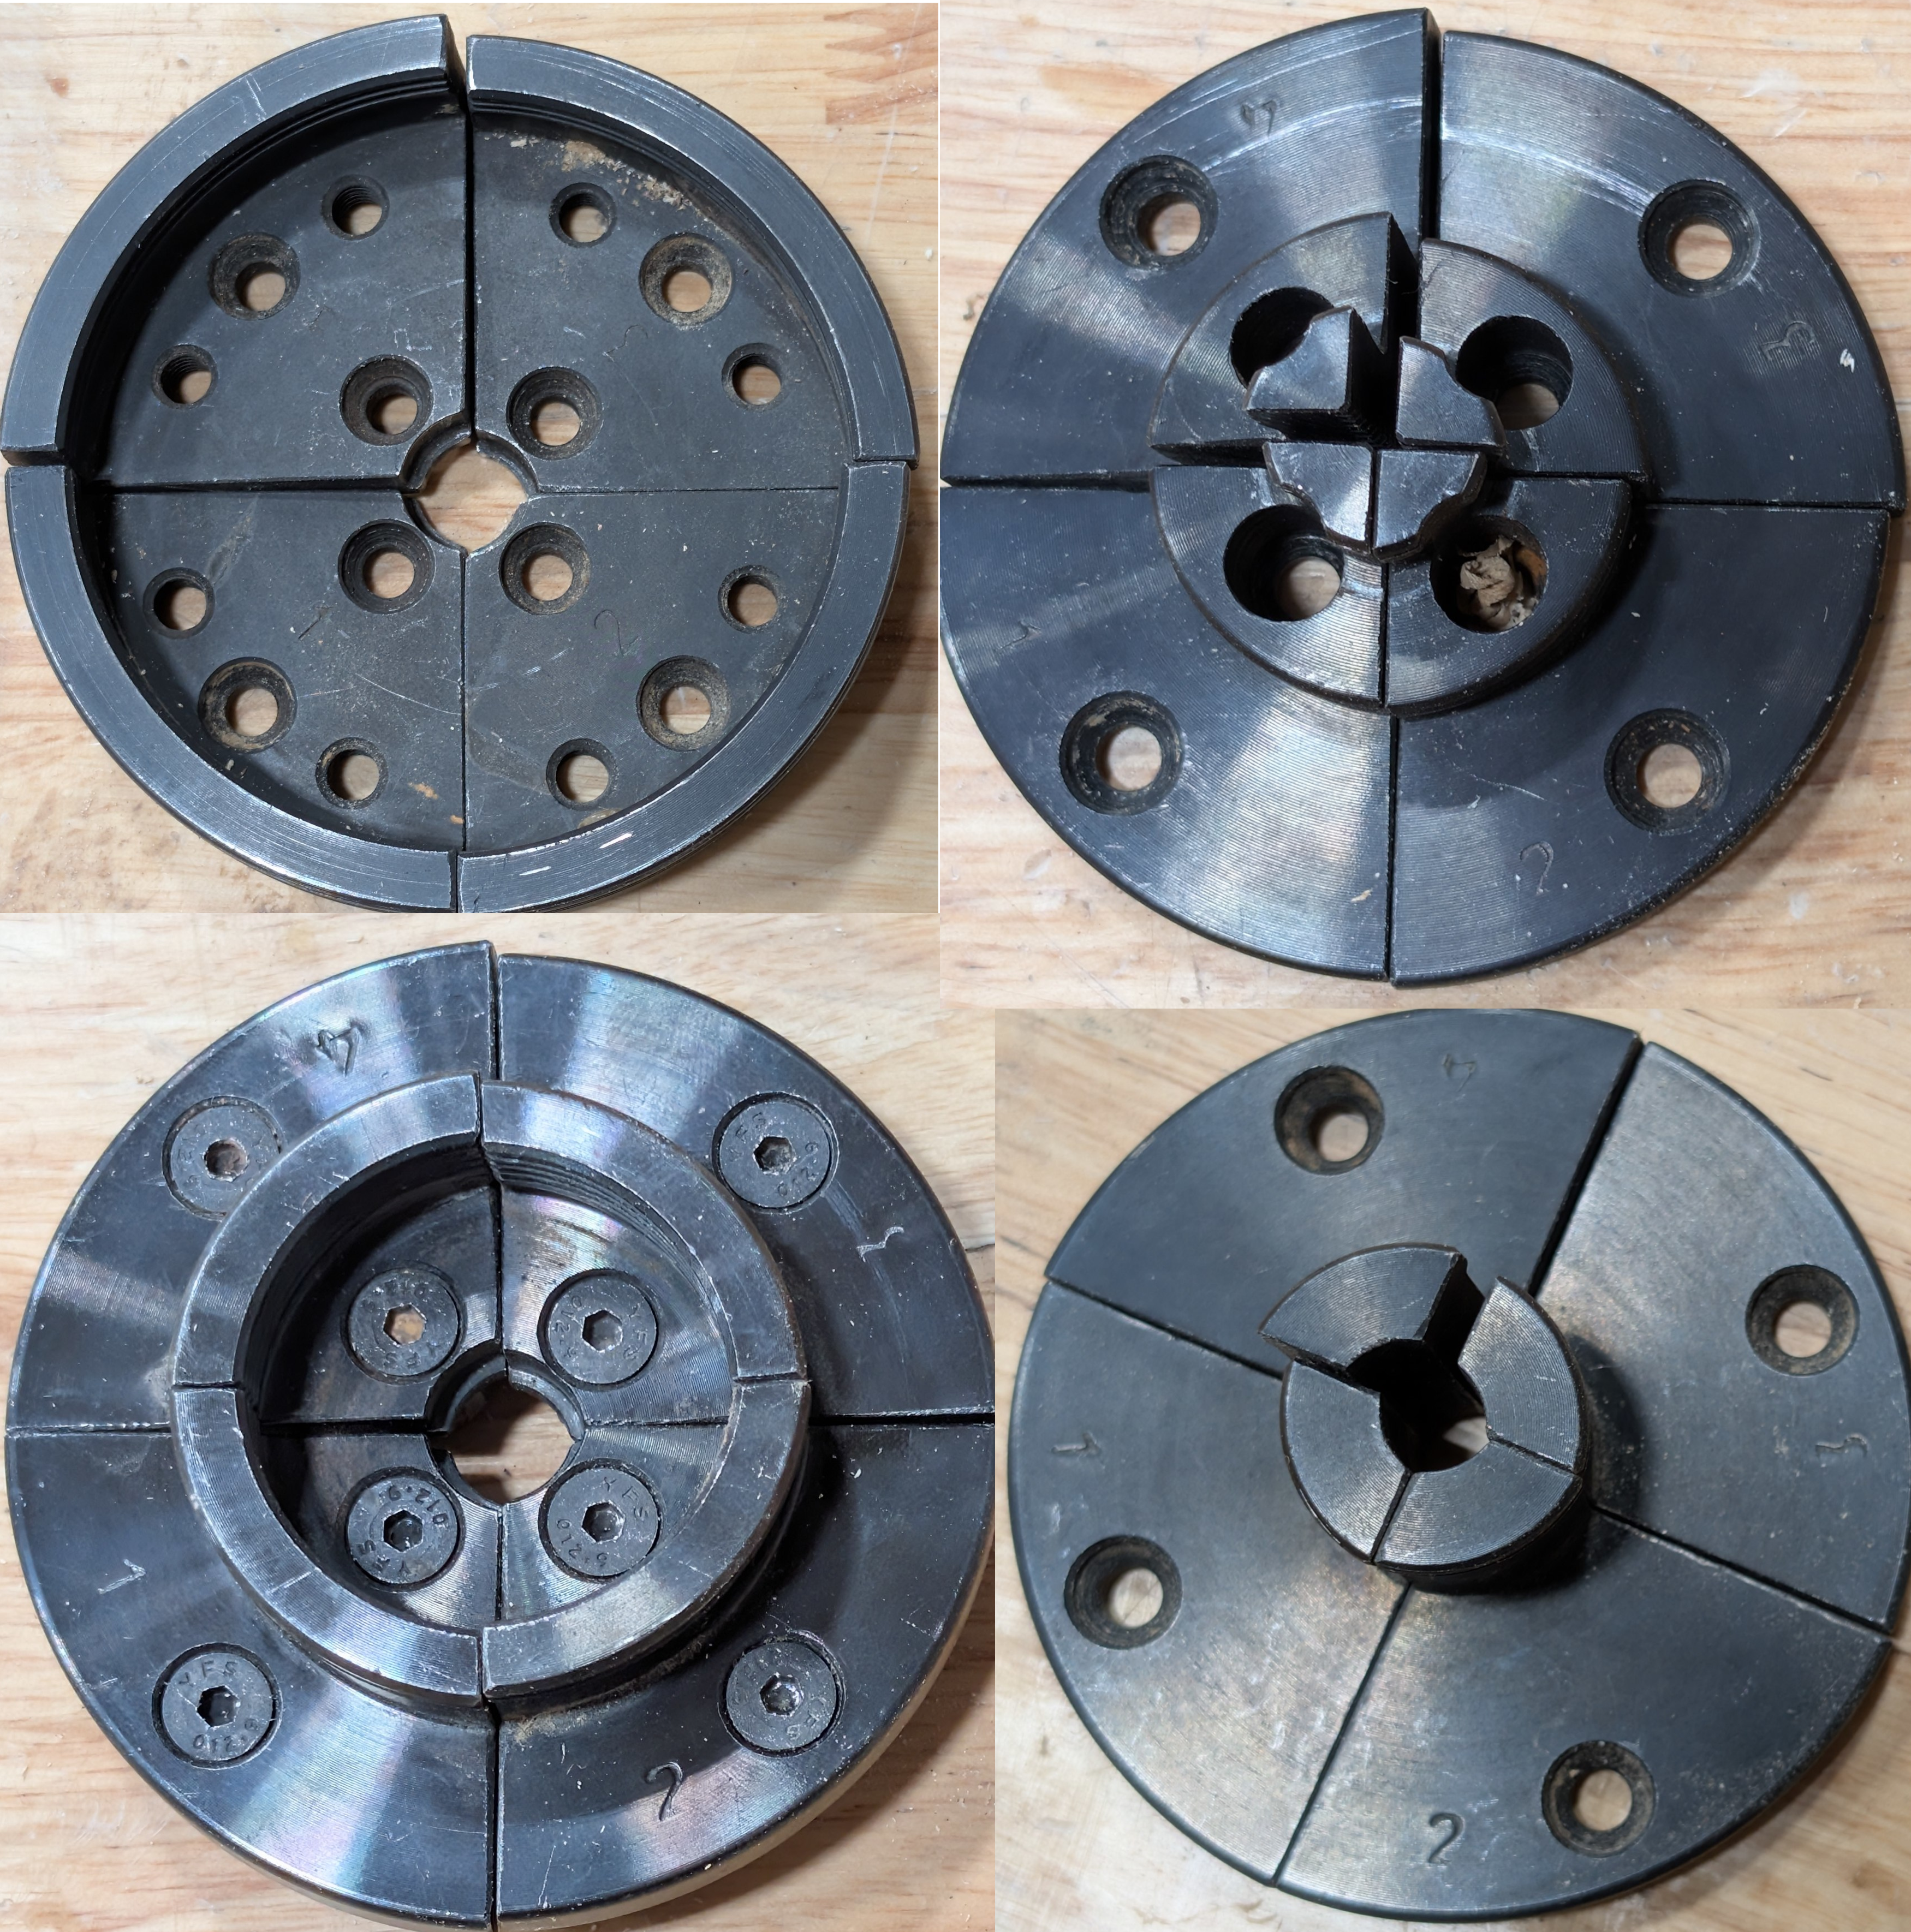
The expandable chuck has four sets of jaw options in the shop. These jaws provide different options for workholding depending on current size, or design, of a workpiece. Larger jaws are typically used to hold the foot of a bowl, or large non-spindle shapred workpieces. Smaller jaws can be used to hold things such as pen blanks, or can be used in the reverse to expand into the mouth of a bowl. Each jaw has a stamp numbered 1-4 that is associated with a carrier.
Faceplate
An alternative to using the chuck. This is a good option for turning the outside of bowls. The flaceplate screws into the side of your bowl where the mouth/opening will be. The screw holes are fine because they were will be turned away later. This offers a simple and secure option for workholding.
Turning Tools
Note
The sections below cover the very, very bare basics to get users started. Sizes of gouge tools will differ as manufacturers from Europe measure the inside flute distance, whereas Canadian and American manufacturers measure the bar stock.
Gouges
Spindle Roughing Gouge
Tip
Recommended as the first tool to use when learning woodturning.
Overview
Used for taking away a lot of material quickly, such as turning square stock into round. Not recommended for detail work or face work.
Usage and anatomy
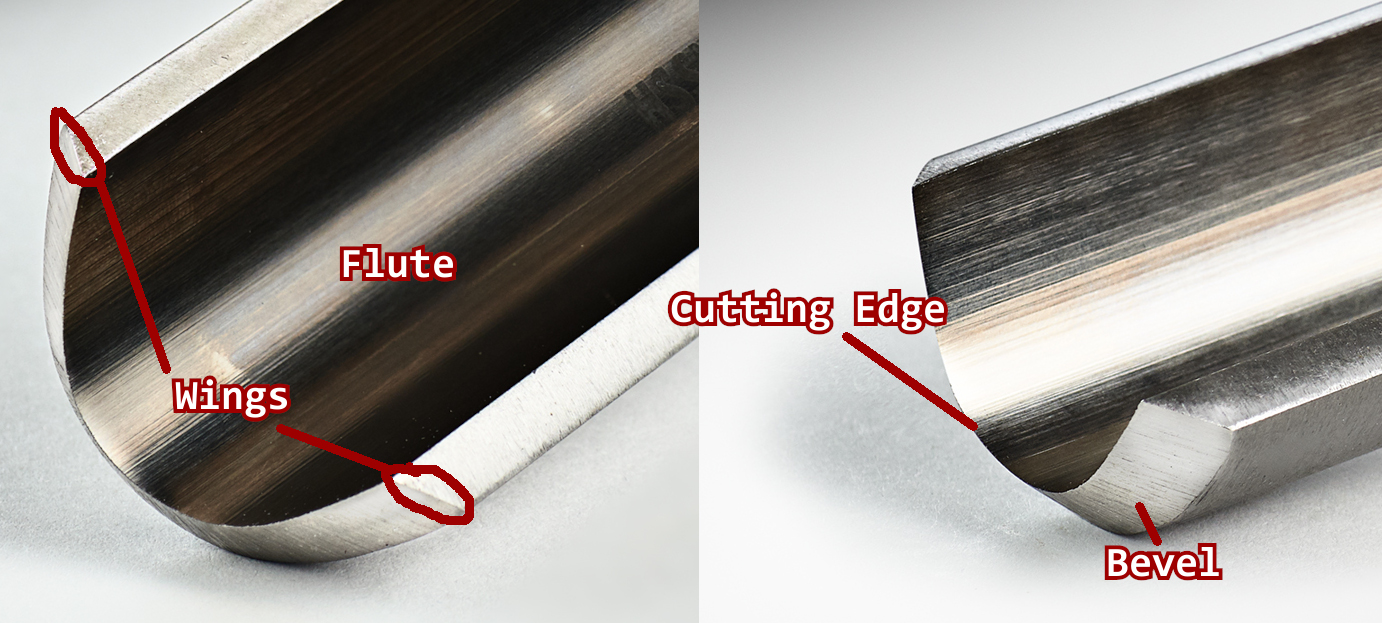
The flute of the gouge is a centered "U" shape. The roughing gouge can be used perpendicular to the workpiece, but this tool should generally be used at a slight angle to the workpiece. The bevel should touch the workpiece before the cutting edge. Try to stay away from the top corners of the "U" as this can cause a catch. Keep the leading edge, which is the edge that is lower during a cut, away from the wood. Your hand can be used as a depth stop on the tool and tool rest. Body movement is also important when trying to achieve a parallel cut, and you should used your hips and torso to follow your cut. When first roughing a piece, such as square stock, chips will be producing instead of shavings.
Tutorials
Bowl Gouge/Spindle Gouge
Tip
Recommended as the second tool to use when learning woodturning.
Overview
Sometimes also called a detail gouge, contour gouge, or fingernail gouge. Despite the lack of name standardization, this tool excels at long-grain turning. Long-grain turning is when the grain of the wood is mounted parallel to the bed, which many know as a "spindle". This tool is a great choice for cutting coves, beads, ogees, and other variations of convex and concave shapes. These traits make it ideal for detail work, but not for roughing work. These tools are much smaller than roughing gouges.
Usage and anatomy
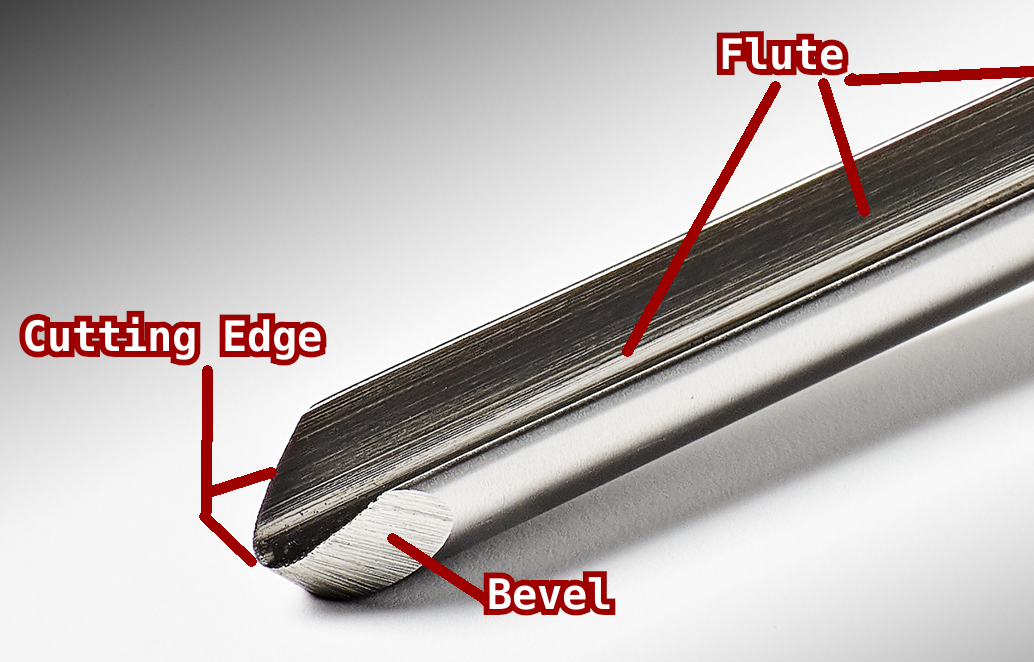
Just like the roughing gouge, the bowl gouge is a "U" shape. The shape differs slightly as the flute is much more aggressive. Before starting any cut, ensure the bevel of the bowl gouge is rubbing/touching the wood before starting a cut. This helps to prevent catches. Do not try forcing this tool through a cut. When cutting, keep one hand on the rest and the other towards the end of the handle. Keep your grip firm, but not tight. Smooth, continuous motions are what help this tool shine.
Tutorials
- Richard Raffan on the uses of a ½-in spindle gouge
- Mastering the Spindle Gouge - Basic Cuts & Practice Exercises
Chisels
Parting Tool
Tip
This is a beginner friendly tool.
Overview
This tool is used to square up ends of a spindles, cut tenons, separate parts from a spindle (such as supports), or for adding decorative accoutrements.
Usage and anatomy
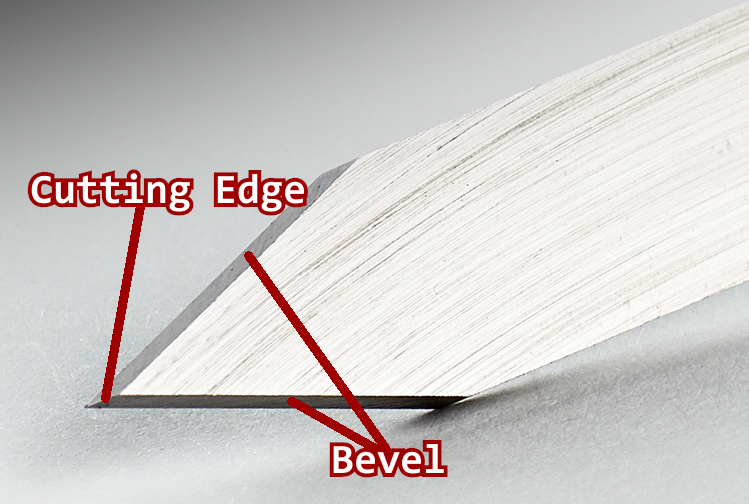
Place the tool rest parallel to the workpiece and slightly below centerline for this tool. Place the tool on its side, with the bevels pointing left and right. To being a cut start with an arcing motion into the center of the workpiece starting at an approximate 45 degree relative to the workpiece. Like similar cuts, achieve the arc by raising the handle of the tool slowly and using the tool rest as a pivot point.
Tutorials
Skew Chisel
Info
This is not a beginner friendly tool. Watching a few tutorials before attempting is recommended.
Overview
Very versatile tool that can perform V-cuts, parting cuts, planing cuts, and can also be used for smoothing. The cutting edge angle has a long point and a short point, thus the name "skew". Most skew chisels have a 40-45 bevel angle. It is also recommended to use this tool with the rest in a higher position than you would use for your gouge (slightly above center)
Usage and anatomy
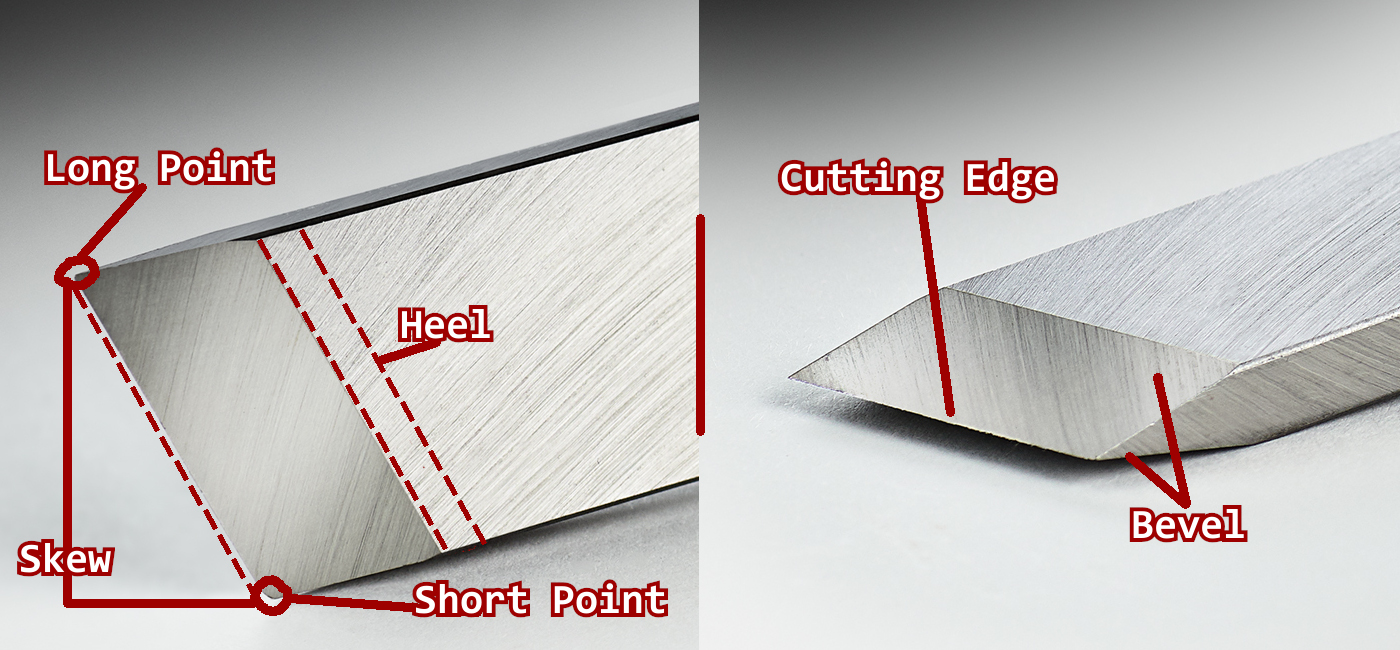
There are four important cuts for mastery of this tool:
The Peel Cut
This is a roughing cut. It is used to remove large amounts of material, such as removing square corners. This cut can also be used to reduce the diameter of your workpiece quickly. To perform this cut the handle of the tool needs to start in a low position, and then arc into the wood. The goal is to bring the cutting edge towards the center and peel away wood. Lead with the long point with the cutting edge parallel to the workpiece. Never enter a cut straight on.
The V-Cut
This is a useful cut for defining features and transitions, and for cleaning up end grain. This is also an arcing cut. The long point should be facing downwards closest to the tool rest. The bevel should face into the direction you want to cut. When taking cuts work a little each time alternating between sides of the V.
The Planing Cut
This cut is great for achieving a great surface finish, that when done correctly, doesn't require sanding. This is a bevel riding cut. Slowly raise the handle until the cutting edge enages at approximately 45 degrees to the wood. The cutting edge should favor the short point. Advance the tool across the tool rest maintaining cosistent pressure.
The Scrape
This cut is used for refining curves. Lay the tool flat on the rest and engage the wood using the approximate center of the cutting edge. Lightly traverse across the surface. It is important to note that this cut does have a tendency to dull the cutting edge faster.
Tutorials
- Richard Raffan on skew chisel basics
- Taming the Beast: The Complete Guide to Mastering Your Skew Chisel
Sorby Spindlemaster
Info
This is not a beginner friendly tool. Watching a few tutorials before attempting is recommended.
Overview
Ideal for rolling beads or cutting coves. Top face of the tool is honed flat, and the bevel is a smooth half-circle. It can behave as both a scraping and cutting tool. A more specialized alternative to a skew chisel. Do not cut with the tip of the tool, as this is an unsupported edge.
Usage and anatomy
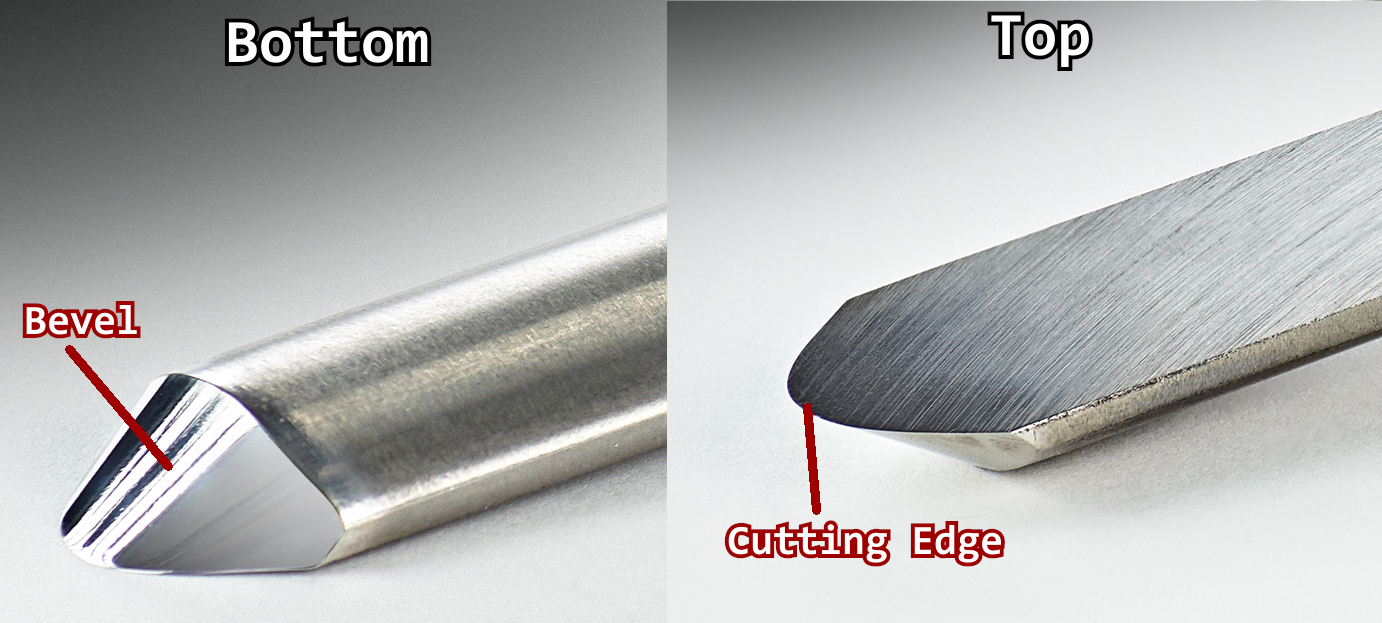
The Spindlemaster is a hybrid tool that aims to combine the functions of a skew, spingle gouge, and a beading tool. The unique shape is intended to help prevent catches that a user might experience with a skew. To use this tool, present the tool to the wood with the bevel first and then gradually raise the tool handle until the cutting edge engages with the wood. Keep the tool rotating and arcing smoothly to maintain a consistent cut. While getting to know this tool you should first take light cuts before to get a feel for how the tool behaves.
Tutorials
- A video guide to the Robert Sorby Spindlemaster
- The Robert Sorby Spindlemaster - An easy to use alternative for the regular skew chisel